
티스토리 뷰
이전 포스팅 : [Spring Boot] Spring MVC CRUD를 위한 방명록 프로젝트 - 1
코드 참고 : https://github.com/on1ystar/guestbook2
GitHub - on1ystar/guestbook2
Contribute to on1ystar/guestbook2 development by creating an account on GitHub.
github.com
Goals
프로젝트 구조 설계기본 설정 세팅 및 테스트방명록 등록(Create)- 방명록 목록 조회 및 단일 조회(Read)
- 방명록 수정 및 삭제(Update & Delete)
- 방명록 검색(Search)
방명록 목록 조회 및 단일 조회(Read)
메인 페이지인 /guestbook/list.html에서 방명록의 전체 목록을 페이징하여 출력하는 기능을 구현해 보자.
방명록 목록 조회를 위한 DTO 구현
페이징 기능을 구현하기에 앞서 고려해볼 부분은, 데이터베이스에서 조회한 Guestbook entity 리스트를 화면에 뿌려줄 때 필요한 데이터만 따로 DTO 객체에 담아서 넘기는 것이 좋다는 것이다.
등록 기능을 구현할 때는 사용자의 요청 데이터를 DTO에 담은 뒤, entity로 변환하여 데이터베이스에 저장했다(이를 위해 GuestbookServiceImpl에서 dtoToEntity 메서드를 구현했었음).
이번에도 사용자가 요청한 페이지에 대한 정보를 담은 PageRequestDTO와 이를 응답하는 PageResponseDTO를 구현함으로써 entity를 그대로 사용하는 것은 지양하겠다.
/dto/PageRequestDTO.java
...

@Data
@Builder
@AllArgsConstructor
public class PageRequestDTO {

    private int page;       // 요청한 페이지 번호
    private int size;       // 한 페이지에 담기는 방명록 수

    public PageRequestDTO() {
        // Default values
        this.page = 1;
        this.size = 10;
    }

    public Pageable getPageable(Sort sort) {

        return PageRequest.of(page - 1, size, sort);
    }
}
사용자가 요청하는 정보에는 총 2가지가 있다.
page: 요청한 페이지 번호size: 한 페이지에 담기는 방명록 수
이 정보를 바탕으로 Pageable 인스턴스를 반환하는 getPageable 메서드를 구현했다. 이때 정렬 정보를 파라미터로 받도록 했다.
(+ 페이징 처리에 대한 내용은 [Spring Boot] Spring Data JPA 페이징/정렬 처리 포스팅 참고)
/dto/PageResponseDTO.java
...

@Data
public class PageResponseDTO<DTO, EN> {

    private List<DTO> dtoList;
    private int page;                   // 현재 페이지
    private int start;                  // 시작 페이지
    private int end;                    // 끝 페이지
    private boolean prev;               // 이전 페이지 목록 여부
    private boolean next;               // 다음 페이지 목록 여부
    private List<Integer> pageList;     // 페이지 목록

    public PageResponseDTO(Page<EN> pageList, Function<EN, DTO> fn) {

        this.dtoList = pageList.stream().map(fn).collect(Collectors.toList());

        Pageable pageable = pageList.getPageable();
        int totalPages = pageList.getTotalPages();
        int pageSize = pageable.getPageSize();

        this.page = pageable.getPageNumber() + 1;

        int tempEnd = (int)(Math.ceil(this.page / (double)pageSize)) * pageSize;

        this.start = tempEnd - pageSize + 1;
        this.end = tempEnd < totalPages ? tempEnd : totalPages;
        this.prev = this.start != 1;
        this.next = this.end != totalPages;
        this.pageList = IntStream.rangeClosed(this.start, this.end).boxed().collect(Collectors.toList());
    }

}
페이지 요청에 대한 응답 DTO에는 DTO 목록(방명록에서는 GuestbookDTO 리스트), 페이징 처리에 필요한 값들을 멤버 변수로 가지고 있다.
이 클래스는 Generic 클래스로 DTO 타입과 EN(Entity) 타입을 가지고 있다.
이렇게 설계한 이유는 Guestbook 이외의 객체들에게도 적용할 수 있는 페이지 응답 DTO 클래스를 작성해보기 위해서다.
때문에 dtoList를 초기화 하는 부분도 외부에서 각 Entity에 맞게 DTO로 변환하는 방법을 따로 구현한 함수형 인터페이스 Function<EN, DTO>을 파라미터로 받아서 이용한다.
(+ 함수형 인터페이스에 대한 설명은 [Java] 람다식과 함수형 인터페이스, java.util.function 참고)
Page<EN>의 각 Entity에 접근해 fn을 적용시켜 DTO로 변환한 뒤, 결과 값들을 모아 List 타입으로 만들어 준다.
비즈니스 계층 구현
이제 service 계층에서 위 DTO들을 활용해 방명록 목록 리스트 응답을 구현해 보자.
먼저 GuestbookService 인터페이스에서 list 메서드를 정의하고, Entity를 DTO로 변환하는 default 메서드를 작성한다.
...

public interface GuestbookService {

    Long register(GuestbookDTO guestbookDTO);

    PageResponseDTO<GuestbookDTO, Guestbook> list(PageRequestDTO pageRequestDTO);

    default Guestbook dtoToEntity(GuestbookDTO guestbookDTO) {

        // ...

    }

    default GuestbookDTO entityToDto(Guestbook guestbook) {

        GuestbookDTO guestbookDTO = GuestbookDTO.builder()
            .gno(guestbook.getGno())
            .title(guestbook.getTitle())
            .content(guestbook.getContent())
            .writer(guestbook.getWriter())
            .regDate(guestbook.getRegDate())
            .modDate(guestbook.getModDate())
            .build();

        return guestbookDTO;
    }
}
방명록 목록을 만들어 주는 메서드 list의
- 파라미터 :
PageRequestDTO - 반환 타입 :
PageResponseDTO
즉, 사용자 페이지 요청을 페이지 응답으로 반환한다.
GuestbookServiceImpl.java
@Service
@Log4j2
@RequiredArgsConstructor
public class GuestbookServiceImpl implements GuestbookService {

    private final GuestbookRepository guestbookRepository;

    @Override
    public Long register(GuestbookDTO guestbookDTO) {

        // ...
    }

    @Override
    public PageResponseDTO<GuestbookDTO, Guestbook> list(PageRequestDTO pageRequestDTO) {

        log.info("get guestbook list");

        Sort sort = Sort.by("gno").descending();

        Pageable pageable = pageRequestDTO.getPageable(sort);

        Page<Guestbook> findAllResult = guestbookRepository.findAll(pageable);

        Function<Guestbook, GuestbookDTO> fn = guestbook -> entityToDto(guestbook);

        return new PageResponseDTO<>(findAllResult, fn);

    }
}
구현은 간단하다.
먼저 Pageable 인터페이스 생성에 들어갈 옵션인 Sort를 정의한 뒤 getPageable 메서드를 호춯한다.
참고로 findAll 메서드는 PagingAndSortingRepository 인터페이스의 메서드다.
이미 default 메서드로 Entity를 DTO로 바꾸는 방법을 정의해 놓았기 때문에 java.util.function에서 제공하는 함수형 인터페이스 Function을 람다식으로 간단하게 정의한다.
이때 Generic 타입 순서를 바꿔서 넣지 않도록 주의하자.
마무리로 간단한 테스트를 진행한다.
GuestbookServiceTests.java
@Test
public void listTest() {

    // Given
    int page = 1;
    int size = 10;
    int startPage = 1;
    int endPage = startPage + size - 1;
    PageRequestDTO pageRequestDTO = new PageRequestDTO(page, size);

    // When
    PageResponseDTO<GuestbookDTO, Guestbook> pageResponseDTO = guestbookService.list(pageRequestDTO);

    // Then
    Assertions.assertThat(pageResponseDTO.getDtoList().stream().findAny().get()).isInstanceOf(GuestbookDTO.class);
    Assertions.assertThat(pageResponseDTO.getPage()).isEqualTo(page);
    Assertions.assertThat(pageResponseDTO.getStart()).isEqualTo(startPage);
    Assertions.assertThat(pageResponseDTO.getEnd()).isEqualTo(endPage);
    Assertions.assertThat(pageResponseDTO.isPrev()).isEqualTo(false);
    Assertions.assertThat(pageResponseDTO.isNext()).isEqualTo(true);
    Assertions.assertThat(pageResponseDTO.getPageList().size()).isEqualTo(size);
1페이지를 요청한 상황에서 PageResponseDTO의 멤버 변수들을 검증하는 테스트다.
테스트 성공 여부를 꼭 확인하자.
프레젠테이션 계층 구현
이전에 방명록 등록 기능 구현 때 만들어 둔 list.html에 방명록 목록을 출력할 것이다. 이때 방명록 뿐만 아니라 PageResponseDTO에 있는 pageList를 링크 처리된 페이지 번호로 만들어 준다.
GuestbookController에서 이전에 만들어 둔 list 메서드를 수정한다.
@GetMapping("/list")
public void list(PageRequestDTO pageRequestDTO, Model model) {

    log.info("GET request : /guestbook/list");

    model.addAttribute("pageResponseDTO", guestbookService.list(pageRequestDTO));

}
View에서 PageRequestDTO의 데이터를 자동 수집할 수 있도록 파라미터로 선언했다.
Thymeleaf 템플릿을 사용해 방명록 목록을 그려줄 것이므로, Model 객체 속성에 guestbookService.list() 반환 값인 PageResponseDTO를 담아준다.
이제 사용자에게 페이징 처리가 된 방명록 목록이 보여질 수 있도록 list.html를 작성한다.
먼저 방명록 목록을 그릴 테이블이다.
...

<!-- Guestbook List -->
<table class="table table-striped">
    <thead>
        <tr>
            <th scope="col">#</th>
            <th scope="col">Title</th>
            <th scope="col">Writer</th>
            <th scope="col">Registered Date</th>
        </tr>
    </thead>
    <tbody>
        <tr th:each="dto : ${pageResultDTO.dtoList}">
            <th scope="row">
                <a href="#">
                    [[${dto.gno}]]
                </a>
            </th>
            <td>[[${dto.title}]]</td>
            <td>[[${dto.writer}]]</td>
            <td>[[${#temporals.format(dto.regDate, 'yyyy/MM/dd')}]]</td>
        </tr>
    </tbody>
</table>

...th:each로 pageResultDTO의 getDtoList를 호춯하여 DTO 리스트를 순회하도록 한다.
column
- #(gno)
- Title
- Writer
- Registered Date(regDate)
추후에 사용자가 gno를 클릭하면 해당 방명록을 조회할 수 있도록 <a> 태그로 링크를 걸어 두었다.
regDate를 출력하는 부분을 보면, 날짜 포맷을 지정하기 위해 Thymeleaf 내장 객체인 temporals를 사용했다.
다음은 페이지 번호를 그리는 부분이다.
...

<!-- Page List -->
<ul class="pagination h-100 justify-content-center align-items-center">

    <li class="page-item" th:if="${pageResponseDTO.prev}">
        <a class="page-link" th:href="@{/guestbook/list(page = ${pageResponseDTO.start - 1})}" tabindex="-1">Previous</a>
    </li>
    <li th:class=" 'page-item ' + ${pageResponseDTO.page == page ? 'active' : ''} " th:each="page : ${pageResponseDTO.pageList}">
        <a class="page-link" th:href="@{/guestbook/list(page = ${page})}">[[${page}]]</a>
    </li>
    <li class="page-item" th:if="${pageResponseDTO.next}">
        <a class="page-link" th:href="@{/guestbook/list(page = ${pageResponseDTO.end + 1})}">Next</a>
    </li>
</ul>

...
각 페이지 번호를 클릭하면 GET 요청으로 page 파라미터에 해당 페이지 번호 값을 넣어 요청이 가도록 링크 처리를 했다. 이때 중요한 부분은, Controller에서 자동으로 PageRequestDTO 파라미터 데이터를 수집할 수 있도록 변수 명을 page로 맞춰주는 것이다.
Previous 버튼과 Next 버튼은 조건부로 있을 수도, 없을 수도 있다.
아래는 실행 결과 화면이다.
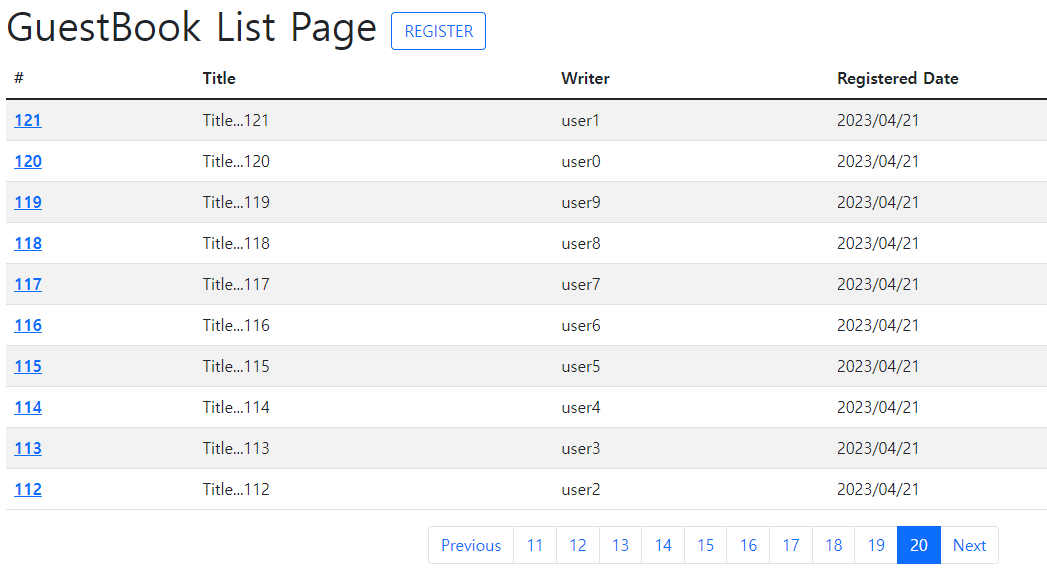
방명록 단일 조회
이제 위 화면에서 방명록 번호(gno)를 클릭했을 때 방명록을 조회할 수 있는 기능이다.
조회할 수 있는 정보들을 모두 화면에 보여줄 것이다.
방명록 목록 기능보다는 훨씬 간단하다. 먼저 서비스 구현이다.
GuestbookService
public interface GuestbookService {

    Long register(GuestbookDTO guestbookDTO);

    PageResponseDTO<GuestbookDTO, Guestbook> list(PageRequestDTO pageRequestDTO);

    GuestbookDTO read(Long gno); // 추가

...
조회 기능을 구현할 read 메서드를 인터페이스에 먼저 정의한다. 조회는 pk인 gno를 사용할 것이기 때문에 파라미터로 선언한다.
GuestbookServiceImpl
...

@Override
public GuestbookDTO read(Long gno) {

    log.info("get guestbook (gno : " + gno + ")");

    Optional<Guestbook> findByIdResult = guestbookRepository.findById(gno);

    return findByIdResult.isPresent() ? entityToDto(findByIdResult.get()) : null;
}

...
findById 메서드로 gno에 해당하는 Guestbook Entity를 조회한 뒤 DTO로 매핑시켜 반환했다.
아주 간단한 테스트도 하나 작성하자.
GuestbookServiceTests
@Test
public void readTest() {

    // Given
    Long gno = 313L;

    // When
    GuestbookDTO guestbookDTO = guestbookService.read(gno);

    // Then
    Assertions.assertThat(guestbookDTO.getGno()).isEqualTo(gno);

}
별거 없는 테스트라도 결과를 꼭 확인.
Controller에서는 방명록 정보를 나타내야 하므로, Model 객체에 GuestbookDTO를 담아 View에 넘겨줘야 한다. 또한, 조회 후 이전 페이지로 돌아가는 버튼을 만들 건데, 이때 이전의 페이지 정보가 필요하므로 페이지 정보를 담은 PageRequestDTO도 함께 파라미터로 받아 둔다.
GuestbookController
...

@GetMapping("/read")
public void read(Long gno, @ModelAttribute("pageRequestDTO") PageRequestDTO dto, Model model) {

    log.info("GET request : /guestbook/read");

    model.addAttribute("guestbookDTO", guestbookService.read(gno));

}

...@ModelAttribute는 model.addAttribute와 동일한 역할은 한다고 이해하면 된다. Model 객체에 메서드로 객체를 바인딩하는 것이 아닌, 파라미터에서 바로 값이 자동 바인딩 되어 View로 전달된다.
예를 들어, GET 요청 시 PageRequestDTO의 멤버 변수인 page 이름으로 파라미터 값이 전달되면 자동으로 바인딩 된 PageRequestDTO 객체가 생성된 후 Model 객체 속성으로 지정된다. 따라서 "pageRequestDTO" 이름으로 View에서 사용할 수 있게 된다.
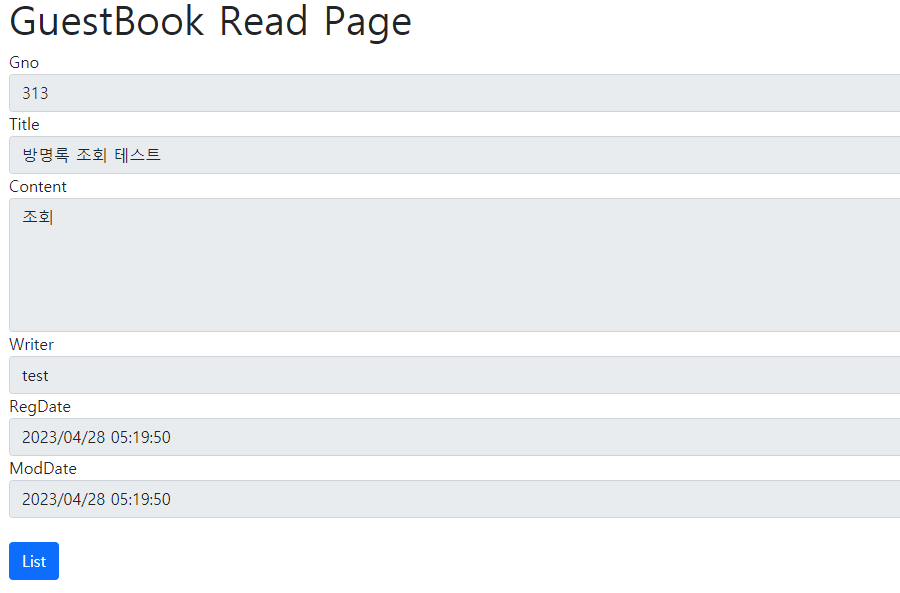
read.html
...

<h1 class="mt-4">GuestBook Read Page</h1>

<div class="form-group">
    <label>Gno</label>
    <input type="text" class="form-control" name="gno" th:value="${guestbookDTO.gno}" readonly>
</div>

<div class="form-group">
    <label>Title</label>
    <input type="text" class="form-control" name="title" th:value="${guestbookDTO.title}" readonly>
</div>

<div class="form-group">
    <label>Content</label>
    <textarea class="form-control" name="content" rows="5" readonly>[[${guestbookDTO.content}]]</textarea>
</div>

<div class="form-group">
    <label>Writer</label>
    <input type="text" class="form-control" name="writer" th:value="${guestbookDTO.writer}" readonly>
</div>

<div class="form-group">
    <label>RegDate</label>
    <input type="text" class="form-control" name="regDate" th:value="${#temporals.format(guestbookDTO.regDate, 'yyyy/MM/dd HH:mm:ss')}" readonly>
</div>

<div class="form-group">
    <label>ModDate</label>
    <input type="text" class="form-control" name="modDate" th:value="${#temporals.format(guestbookDTO.modDate, 'yyyy/MM/dd HH:mm:ss')}" readonly>
</div>

<br>

<a th:href="@{/guestbook/list(page=${pageRequestDTO.page})}" style="text-decoration: none;">
    <button type="button" class="btn btn-primary">List</button>
</a>

...
단순 조회 페이지이므로 각 input 태그에 readonly 속성을 부여했고, List 버튼은 페이지 정보를 가지고 이전 방명록 목록으로 돌아갈 수 있도록 했다.
마지막으로 방명록 목록 페이지에서 gno를 클릭하면 조회 페이지로 이동할 수 있도록 링크 경로를 수정해 준다.
list.html
...

<tr th:each="dto : ${pageResponseDTO.dtoList}">
	<th scope="row">
	    <a th:href="@{/guestbook/read(gno = ${dto.gno}, page = ${pageResponseDTO.page})}">
	        [[${dto.gno}]]
	    </a>

...
이때 꼭 페이지 정보도 같이 파라미터 값으로 넣어 준다(th: 빼먹지 말기).
List 버튼을 눌렀을 때 이전 페이지로 잘 돌아가는지도 확인해 보길 바란다.
방명록 수정 및 삭제(Update & Delete)
방명록 수정 및 삭제는 방명록 조회 페이지에서 버튼을 눌러 이동하는 것으로 한다.
방명록 수정 구현
사용자가 수정할 수 있는 필드를 정해야 한다. 여기서는 방명록의 제목(title)과 내용(content)만 수정할 수 있도록 하겠다.
수정하는 방법은 Service에서 수정된 Guestbook 객체를 생성해 save 메서드를 호출해도 되지만, JPA의 더티 체킹(Dirty Checking) 기능을 사용해 보려고 한다.
( + 더티 체킹에 대한 자세한 내용은 추후 포스팅)
이를 위해 먼저 /entity/Guestbook에 값을 변경하는 메서드를 작성한다.
...
public class Guestbook extends BaseEntity {

    @Id
    @GeneratedValue(strategy = GenerationType.IDENTITY)
    private Long gno;

    @Column(length = 100, nullable = false)
    private String title;

    @Column(length = 1500, nullable = false)
    private String content;

    @Column(length = 50, nullable = false)
    private String writer;

    public void updateTitle(String title) {

        this.title = title;
    }

    public void updateContent(String content) {

        this.content = content;
    }
}@Setter를 사용하지 않는 이유는 Entity가 함부로 변경될 여지를 굳이 만들지 않기 위해서다. 규약된 메서드이므로 우리가 원치 않는 곳에서 호출될 우려가 많다.
이제 방명록을 수정하는 비즈니스 로직을 Service에 작성한다.
GuestbookService
...

public interface GuestbookService {

    Long register(GuestbookDTO guestbookDTO);

    PageResponseDTO<GuestbookDTO, Guestbook> list(PageRequestDTO pageRequestDTO);

    GuestbookDTO read(Long gno);

    void update(GuestbookDTO guestbookDTO);  // 추가

...
GuestbookServiceImpl
...

@Service
@Log4j2
@RequiredArgsConstructor
@Transactional  // org.springframework.transaction.annotation.Transactional;
public class GuestbookServiceImpl implements GuestbookService {

	...

	@Override
	public void update(GuestbookDTO guestbookDTO) {

	    log.info("update guestbook (gno : " + guestbookDTO.getGno() + ")");

	    guestbookRepository.findById(guestbookDTO.getGno())
	        .ifPresent( guestbook -> {
	            guestbook.updateContent(guestbookDTO.getContent());
	            guestbook.updateTitle(guestbookDTO.getTitle());
	        }
	    );

	}

...
update 메서드는 GuestbookDTO 객체를 파라미터로 받아 gno에 해당하는 Entity를 조회한다.
그 다음 이 Entity의 content와 title을 변경해 준다. 이러면 방명록 수정을 위한 비즈니스 로직은 끝이다. 우리는 따로 save 메서드를 호출하지 않아도 된다.
단, 이를 위해서는 트랜잭션 로직을 추가해 줘야 한다. JPA에서는 트랜잭션이 끝나는 시점에 변화가 있는 모든 엔티티 객체를 데이터베이스에 자동으로 반영한다. 이때 ‘변화가 있다’의 기준은 최초 조회 상태다.
트랜잭션을 추가하는 가장 간단하면서 선호되는 방법은 @Transactional 어노테이션이다(선언적 트랜잭션).
( + https://mangkyu.tistory.com/170 참고)
테스트 코드를 작성해보자.
@Test
public void updateTest() {

    // Given
    Long gno = 313L;
    String title = "Updated";
    String content = "Updated";
    GuestbookDTO guestbookDTO = GuestbookDTO.builder()
        .gno(gno)
        .title(title)
        .content(content)
        .build();

    // When
    guestbookService.update(guestbookDTO);

    // Then
    guestbookRepository.findById(gno).ifPresent((guestbook) -> {
        Assertions.assertThat(guestbook.getTitle()).isEqualTo(title);
        Assertions.assertThat(guestbook.getContent()).isEqualTo(content);
        Assertions.assertThat(guestbook.getModDate()).isAfter(guestbook.getRegDate());
    });

}
변경된 title과 content를 검증하고, 자동으로 수정되는 modDate가 regDate보다 이후의 시간인 지 까지 검증해 본다.
이제 Service를 Controller에 연결한다.
GuestbookController
...

@Controller
@RequestMapping("guestbook")
@Log4j2
public class GuestbookController {

    ...

    @GetMapping({"/read", "/update"})
    public void read(HttpServletRequest request, Long gno, @ModelAttribute("pageRequestDTO") PageRequestDTO dto, Model model) {

        String url = request.getRequestURI().contains("read") ? "read" : "update";

        log.info("GET request : /guestbook/" + url);

        model.addAttribute("guestbookDTO", guestbookService.read(gno));

    }

		@PostMapping("/update")
    public String update(GuestbookDTO guestbookDTO, PageRequestDTO pageRequestDTO, RedirectAttributes redirectAttributes) {

        log.info("POST request : /guestbook/update");

        guestbookService.update(guestbookDTO);

        redirectAttributes.addAttribute("pageRequestDTO", pageRequestDTO);

        return "redirect:/guestbook/read";

    }

}
사실 GET 요청 처리는 방명록 조회와 동일하기 때문에 @GetMapping의 다중 매핑 기능으로 /update를 추가한다.
이때 각 요청에 따른 로그 처리를 위해 HttpServletRequest로 url을 파싱해 문자열을 만들도록 했다.
POST 요청 시에는 방명록 수정 후, 수정된 방명록의 조회 페이지로 리다이렉트 되도록 했다. 그러기 위해서는 요청 파라미터로 gno와 page 값을 넘겨줘야 한다.
redirectAttributes.addAttribute() 메서드는 리다이렉트 시 추가한 속성을 key = value 형태로 요청 파라미터에 추가시켜 준다.
마지막으로 View를 작성하자.
방명록 조회 페이지에서 수정 버튼을 추가해 준다.
read.html
...

<a th:href="@{/guestbook/list(page=${pageRequestDTO.page})}" style="text-decoration: none;">
    <button type="button" class="btn btn-info">List</button>
</a>

<a th:href="@{/guestbook/update(gno = ${guestbookDTO.gno}, page=${pageRequestDTO.page})}" style="text-decoration: none;">
    <button type="button" class="btn btn-primary">Update</button>
</a>
Update 버튼을 누르면 gno에 해당하는 방명록을 업데이트 할 수 있는 페이지로 이동한다.
update.html
...
<h1 class="mt-4">GuestBook Update Page</h1>

<form action="/guestbook/update" method="post" id="updateForm">

    <!-- post 요청이기 때문에 page 정보를 form 데이터로 넘겨줘야 함 -->
    <input type="hidden" name="page" th:value="${pageRequestDTO.page}">

    <div class="form-group">
        <label>Gno</label>
        <input type="text" class="form-control" name="gno" th:value="${guestbookDTO.gno}" readonly>
    </div>

    <div class="form-group">
        <label>Title</label>
        <input type="text" class="form-control" name="title" th:value="${guestbookDTO.title}" >
    </div>

    <div class="form-group">
        <label>Content</label>
        <textarea class="form-control" name="content" rows="5" >[[${guestbookDTO.content}]]</textarea>
    </div>

    <div class="form-group">
        <label>Writer</label>
        <input type="text" class="form-control" name="writer" th:value="${guestbookDTO.writer}" readonly>
    </div>

    <div class="form-group">
        <label>RegDate</label>
        <input type="text" class="form-control" th:value="${#temporals.format(guestbookDTO.regDate, 'yyyy/MM/dd HH:mm:ss')}" readonly>
    </div>

    <div class="form-group">
        <label>ModDate</label>
        <input type="text" class="form-control" th:value="${#temporals.format(guestbookDTO.modDate, 'yyyy/MM/dd HH:mm:ss')}" readonly>
    </div>

</form>
<br>

<button type="button" class="btn btn-info" id="cancleBtn">Cancle</button>
<button type="button" class="btn btn-primary" id="updateBtn">Update</button>

<script th:inline="javascript">
    const form = document.getElementById("updateForm");

    const cancleBtn = document.getElementById("cancleBtn");
    const updateBtn = document.getElementById("updateBtn");

    cancleBtn.addEventListener("click", () => {

        while (form.firstChild) {
            form.removeChild(form.firstChild);
        }

        const gnoInput = document.createElement('input');
        gnoInput.type = "text";
        gnoInput.name = "gno";
        gnoInput.value = [[${guestbookDTO.gno}]];

        const pageInput = document.createElement('input');
        pageInput.type = "text";
        pageInput.name = "page";
        pageInput.value = [[${pageRequestDTO.page}]]

        form.insertAdjacentElement('afterbegin', gnoInput);
        form.insertAdjacentElement('afterbegin', pageInput);
        form.setAttribute("action", "/guestbook/read");
        form.setAttribute("method", "get");
        form.submit();
    })

    updateBtn.addEventListener("click", () => {

        if(!confirm("수정하시겠습니까?")) {
            return ;
        }

        form.setAttribute("action", "/guestbook/update");
        form.setAttribute("method", "post");
        form.submit();
    })

</script>

...
수정할 수 있는 title과 content만 readonly 속성을 뺐다. 또한 생성 시간과 수정 시간은 JPA에서 자동으로 넣어줄 것이므로 name 속성을 부여하지 않았다.
Cancle 버튼을 누르면 이전의 방명록 조회 페이지로 이동하고, Update 버튼을 누르면 수정을 위한 POST 요청을 한다.
테스트 화면이다.
방명록 삭제 구현
삭제 기능은 수정 기능보다 훨씬 간단하다. 빠르게 Service - Controller - View 순서로 구현해 보자.
먼저 Service에서 remove 메서드를 구현한다. 삭제 시 방명록의 번호(gno)가 필요하므로 파라미터로 선언한다.
GuestbookService
...

public interface GuestbookService {

    Long register(GuestbookDTO guestbookDTO);

    PageResponseDTO<GuestbookDTO, Guestbook> list(PageRequestDTO pageRequestDTO);

    GuestbookDTO read(Long gno);

    void update(GuestbookDTO guestbookDTO);

    String remove(Long gno);  // 추가

...
GuestbookServiceImpl
...

@Override
public void remove(Long gno) {

    log.info("remove guestbook (gno : " + gno + ")");

    guestbookRepository.deleteById(gno);
}

...
테스트 코드도 간단하게 작성해 본다.
@Test
public void removeTest() {

    // Given
    Long gno = 313L;

    // When
    guestbookService.remove(gno);

    // Then
    Assertions.assertThat(guestbookRepository.findById(gno).isEmpty()).isTrue();
}
삭제한 gno로 조회했기 때문에 findById 결과 값이 비어 있어야 한다.
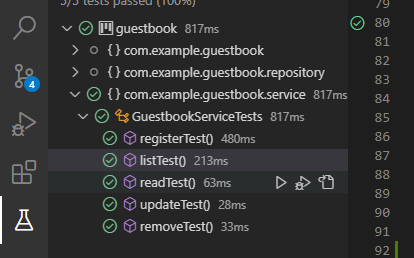
참고로 지금까지 작성한 테스트 코드는 VSCode에서 다음과 같이 성공 여부를 확인할 수 있다.
GuestbookController
...

@PostMapping("/remove")
public String remove(Long gno, PageRequestDTO pageRequestDTO, RedirectAttributes redirectAttributes) {

    log.info("POST request : /guestbook/remove");

    guestbookService.remove(gno);

    redirectAttributes.addAttribute("page", pageRequestDTO.getPage());

		redirectAttributes.addFlashAttribute("msg", "removed " + gno);

    return "redirect:/guestbook/list";
}

...
방명록 삭제 시 방명록 목록 페이지로 리다이렉트 시킨다. 물론 페이지 정보도 같이 넘겨준다.
편의를 위해 삭제됐다는 메세지도 함께 넘겨준다.
이제 방명록 조회 페이지에서 삭제 버튼을 하나 추가하자.
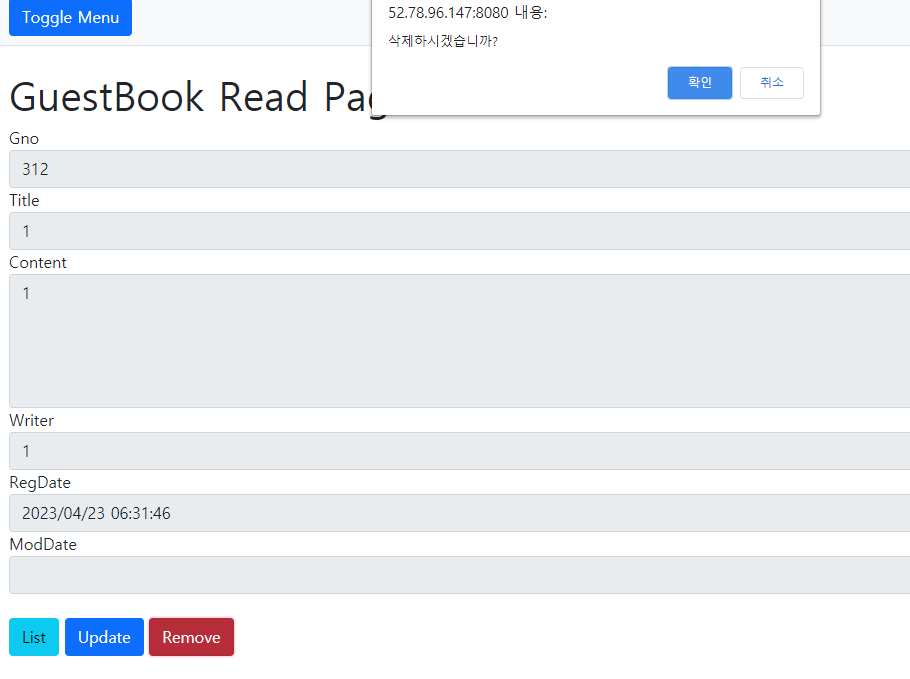
read.html
...

<form action="/guestbook/delete" method="post" id="deleteForm">

		<input type="hidden" name="page" th:value="${pageRequestDTO.page}">

    <div class="form-group">
        <label>Gno</label>
        <input type="text" class="form-control" name="gno" th:value="${guestbookDTO.gno}" readonly>
    </div>

</form>

...

<button type="button" class="btn btn-danger">Remove</button>

<script th:inline="javascript">

    const form = document.getElementById("deleteForm");
    const removeBtn = document.getElementById("removeBtn");


    removeBtn.addEventListener("click", () => {

        if(!confirm("삭제하시겠습니까?")) {
            return ;
        }

        form.setAttribute("action", "/guestbook/remove");
        form.setAttribute("method", "post");
        form.submit();
    })

</script>

...
방명록 삭제는 POST 요청이다. 따라서 input 태그들을 form 태그로 감싸야 하므로, 위와 같이 gno와 page 정보를 담은 hidden 속성 태그를 하나 만든다.
JavaScript로 Remove 버튼을 클릭하면 /guestbook/remove URL로 POST 요청이 보낸다.

생각보다 포스팅이 길어져서, 마지막 검색 기능은 다음 포스팅에서 다루겠다.
References
- 코드로 배우는 스프링 부트 웹 프로젝트 - 구멍가게 코딩단
- 더티 체킹 (Dirty Checking)이란?
- @Transactional
'Spring&Spring Boot' 카테고리의 다른 글
| 스프링이란? 좋은 객체 지향 설계란? (SOLID, 스프링 컨테이너, IoC, DI) (3) | 2024.09.05 |
|---|---|
| [Spring Boot] 입문 - AOP란? AOP 적용해보기 (2) | 2024.09.03 |
| [Spring Boot] Spring MVC CRUD를 위한 방명록 프로젝트 - 1 (0) | 2023.04.27 |
| [Spring] application.properties에 대해 (0) | 2023.04.18 |
| [Spring] DTO를 사용하는 이유 (0) | 2023.03.23 |
- Total
- Today
- Yesterday
- Thymeleaf
- 선형 회귀
- 지옥에서 온 git
- 스프링
- jsp
- Spring Data JPA
- git merge
- 쉘 코드
- 파이썬 for Beginner 연습문제
- 파이썬 for Beginner 솔루션
- 운영체제 반효경
- git branch
- 김영환
- 방명록 프로젝트
- Gradle
- 패킷 스위칭
- 스프링 테스트
- JPA
- 스프링 컨테이너
- fetch join
- Do it! 정직하게 코딩하며 배우는 딥러닝 입문
- Spring
- 프로그래머스
- Computer_Networking_A_Top-Down_Approach
- 쉽게 배우는 운영체제
- git
- Spring Boot
- 생활코딩 javascript
- 스프링 mvc
- Python Cookbook
| 일 | 월 | 화 | 수 | 목 | 금 | 토 |
|---|---|---|---|---|---|---|
| 1 | 2 | 3 | 4 | 5 | ||
| 6 | 7 | 8 | 9 | 10 | 11 | 12 |
| 13 | 14 | 15 | 16 | 17 | 18 | 19 |
| 20 | 21 | 22 | 23 | 24 | 25 | 26 |
| 27 | 28 | 29 | 30 |